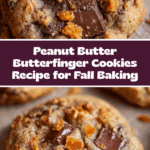
Peanut Butter Butterfinger Cookies Recipe

Delight in the perfect blend of peanut butter and crunchy Butterfinger candy in these irresistible Peanut Butter Butterfinger Cookies. Soft, chewy, and packed with buttery peanut flavor and crispy candy pieces, these cookies are a must-bake treat for any candy lover.
- Prep Time: 20 minutes
- Cook Time: 10 minutes
- Total Time: 30 minutes to 1 hour 30 minutes (including optional chilling)
- Yield: About 25 cookies 1x
- Category: Dessert
- Method: Baking
- Cuisine: American
- Diet: Vegetarian
Ingredients
Scale
Wet Ingredients
- 3/4 cup butter, softened (1 and 1/2 sticks)
- 1/2 cup granulated sugar
- 1/2 cup brown sugar, packed
- 1 cup creamy peanut butter (do not use natural peanut butter, Jif recommended)
- 1 large egg
- 1 1/2 teaspoons vanilla extract
Dry Ingredients
- 1 1/2 cups all-purpose flour, spooned and leveled
- 1/2 teaspoon baking soda
- 1/2 teaspoon baking powder
- 1/4 teaspoon kosher salt
Add-ins
- 16 ounces Butterfinger candy, chopped (about 2 bags of 8-ounce Butterfinger Bits, or 24 fun size bars, or 8 full size bars)
Instructions
- Cream the butter and sugars: In a large bowl or stand mixer, beat 3/4 cup softened butter until creamy and smooth, scraping down the sides. Add 1/2 cup granulated sugar and 1/2 cup packed brown sugar and beat for about 2 minutes until fluffy with no large butter chunks.
- Add peanut butter, egg, and vanilla: Mix in 1 cup creamy peanut butter. Then add 1 large egg and 1 1/2 teaspoons vanilla extract. Beat until just combined, scraping the bowl as needed.
- Combine dry ingredients: In a separate bowl, whisk together 1 1/2 cups all-purpose flour, 1/2 teaspoon baking soda, 1/2 teaspoon baking powder, and 1/4 teaspoon kosher salt. Add these dry ingredients to the wet mixture, initially stirring gently to combine.
- Mix the dough: Turn the mixer on low to combine just until the dough starts to come together but still has some visible flour. Avoid overmixing to prevent tough cookies. Scrape the bowl thoroughly.
- Fold in Butterfinger pieces: Gently fold in 16 ounces of chopped Butterfinger candy until just incorporated. Aim for coarser chunks for best texture.
- Chill the dough: Cover the dough and chill in the refrigerator for 15 minutes up to 24 hours. This step helps with flavor development and handling but is optional.
- Preheat oven and prepare pans: Heat oven to 350°F (175°C). Line two baking sheets with parchment paper or silicone mats.
- Form cookies: Using a 2-inch cookie scoop or spoon, form dough into balls and place them 1-2 inches apart on prepared baking sheets. Aim for about 12 cookies per half sheet.
- Bake: Bake at 350°F for about 10 minutes. Cookies are done when edges are set and centers are no longer shiny. They will be puffy but spread slightly. If not spread enough, gently press tops with a spatula after removing from oven or near the end of baking.
- Cool: Let cookies rest on the baking sheet for at least 5 minutes to set up, then transfer to wire racks to cool completely.
- Serve and store: These cookies are best at room temperature. Store leftovers in an airtight container for up to 3 days. Cookie dough can be frozen up to 3 months and baked directly from frozen with a slight increase in baking time. Baked cookies can be frozen for 4 weeks.
Notes
- Use exactly 16 ounces of chopped Butterfinger candy: this equals two 8-ounce bags of Butterfinger Bits, 24 fun-size bars (~0.8 oz each), or 8 full-size bars (~1.9 oz each).
- Chilling the dough is recommended but optional; it improves flavor and dough handling.
- If you cannot find Butterfinger Bits, chopping regular candy bars works just as well.
- Pressing down cookies after baking helps them spread evenly since dough can be soft.
- Cookies are best eaten at room temperature rather than warm, as the Butterfinger pieces melt and become chewy when hot.
- Dough and cookies freeze very well for make-ahead convenience.
Nutrition
- Serving Size: 1 cookie
- Calories: 169 kcal
- Sugar: 13 g
- Sodium: 120 mg
- Fat: 9 g
- Saturated Fat: 3 g
- Unsaturated Fat: 6 g
- Trans Fat: 1 g
- Carbohydrates: 19 g
- Fiber: 1 g
- Protein: 4 g
- Cholesterol: 17 mg
Keywords: butterfinger, candy, cookies, peanut butter, dessert, chocolate candy, baked goods