Peanut Butter Cup Dump Cake Recipe
Introduction
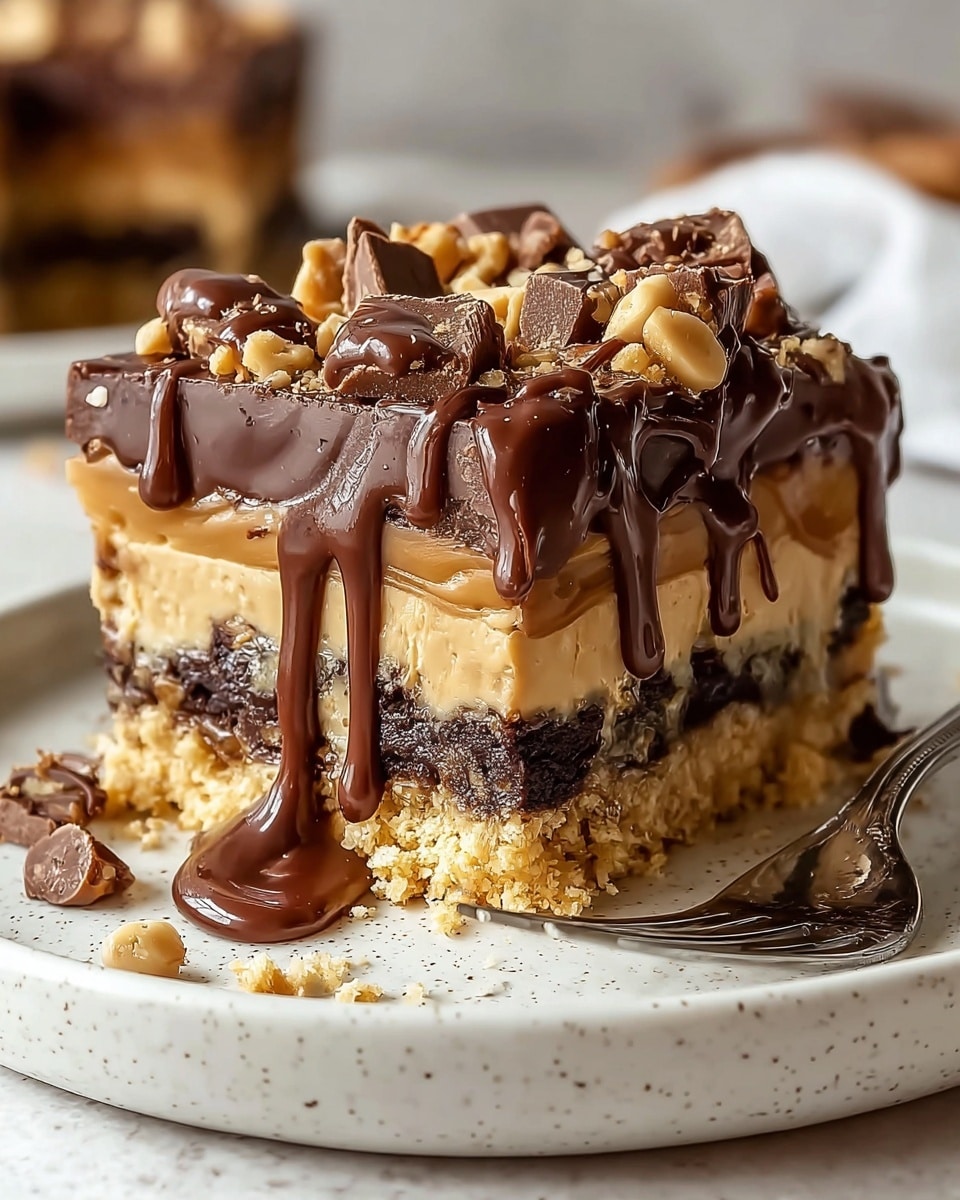
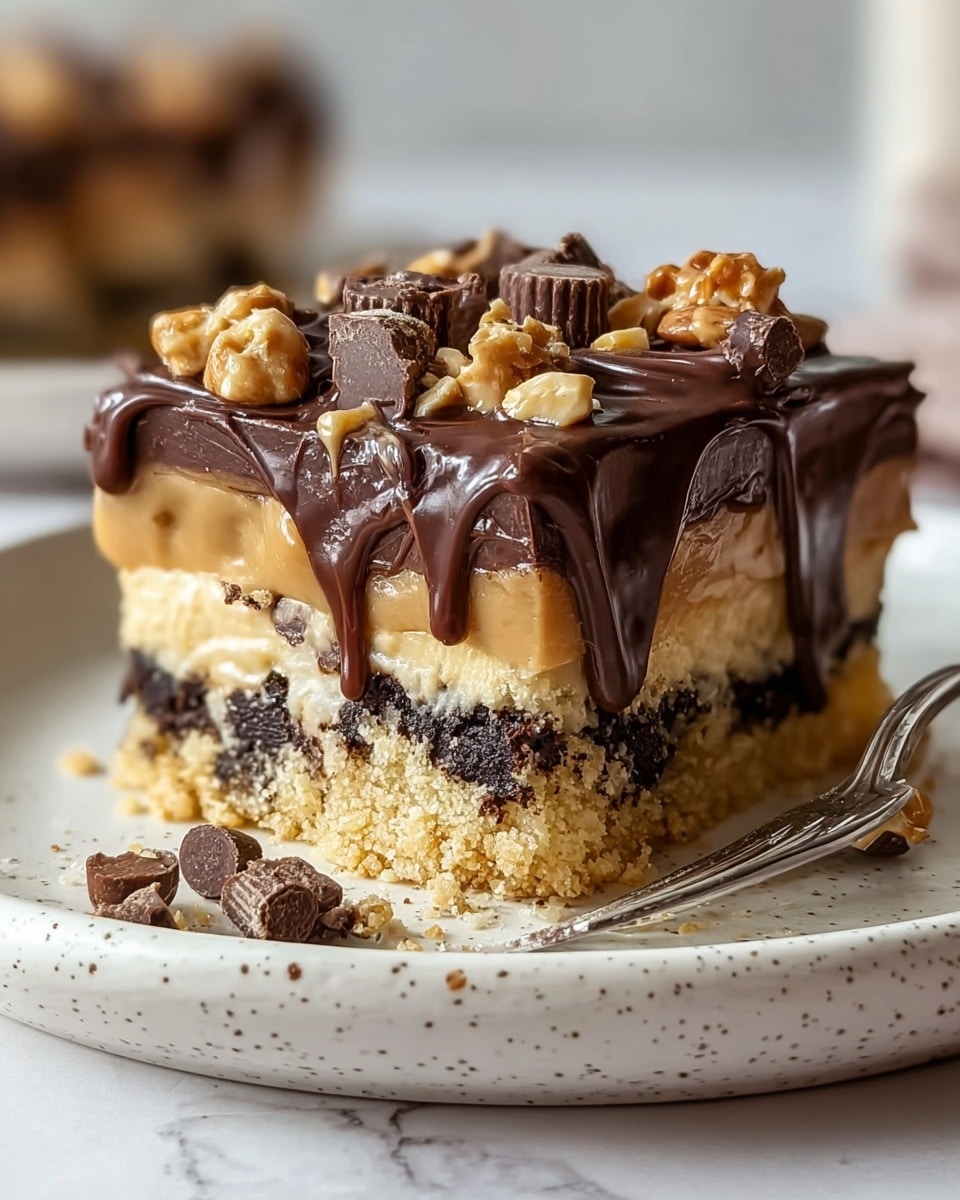
Peanut Butter Cup Dump Cake is a rich and indulgent dessert that combines creamy peanut butter, chocolate cake mix, and gooey peanut butter cups for a delectably easy treat. This no-fuss recipe is perfect for home bakers who want maximum flavor with minimal effort.
Ingredients
- 1 box (15.25 oz) chocolate cake mix
- 1 can (14 oz) sweetened condensed milk
- 1 cup milk (any kind works!)
- 1/2 cup creamy peanut butter
- 1/2 cup butter, melted
- 1 teaspoon vanilla extract
- 1 (10-12 oz) bag of mini peanut butter cups, unwrapped (Reese’s are recommended)
- Optional: Chocolate syrup for drizzling
- Optional: Whipped cream or vanilla ice cream for serving
Instructions
- Step 1: Preheat your oven to 350°F (175°C) and grease a 9×13 inch baking dish with butter or cooking spray.
- Step 2: In a large bowl, combine the sweetened condensed milk and milk. Add the creamy peanut butter and vanilla extract, then whisk or use a hand mixer until the mixture is smooth and creamy, with no lumps.
- Step 3: Pour the peanut butter mixture evenly into the bottom of the prepared baking dish.
- Step 4: Sprinkle the dry chocolate cake mix evenly over the peanut butter mixture. Do not add any other ingredients from the cake mix box.
- Step 5: Drizzle the melted butter evenly over the cake mix layer, spreading gently if needed to coat all areas.
- Step 6: Unwrap the mini peanut butter cups and sprinkle them evenly over the top, pressing them slightly into the cake mix.
- Step 7: Bake in the preheated oven for 30-35 minutes, or until the top is golden and the cake is set but still slightly gooey. A toothpick inserted should come out with moist crumbs, not dry.
- Step 8: Remove from the oven and let cool for 15-20 minutes before serving. This helps the cake set and prevents burns from hot peanut butter cups.
- Step 9: Serve warm, optionally drizzled with chocolate syrup and topped with whipped cream or vanilla ice cream for an extra indulgence.
Tips & Variations
- Try different cake mix flavors like yellow or peanut butter for a new twist.
- Swap mini peanut butter cups with chopped Snickers bars, Reese’s Pieces, or chocolate chips for variety.
- Add chopped peanuts or pecans on top before baking for extra crunch.
- Use a gluten-free chocolate cake mix to make this recipe gluten-free.
- For a slow cooker version, layer the ingredients and cook on low for 3-4 hours until set.
Storage
Store leftover cake in an airtight container at room temperature for up to 3 days. For longer storage, refrigerate it. Reheat servings gently in the microwave to soften the cake and melt the peanut butter cups again.
How to Serve
Serve this delicious recipe with your favorite sides.
FAQs
Can I use natural peanut butter in this recipe?
Yes, you can use natural peanut butter, but make sure to stir it well before measuring, as oil separation can affect texture. It may make the cake slightly less creamy.
Do I have to unwrap the peanut butter cups?
Yes, it’s best to unwrap the mini peanut butter cups so they melt properly during baking and blend into the cake layers for the best flavor and texture.
PrintPeanut Butter Cup Dump Cake Recipe
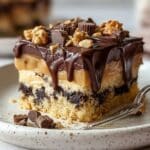
This Peanut Butter Cup Dump Cake is a deliciously simple dessert that layers rich chocolate cake mix with a creamy peanut butter base, topped with mini peanut butter cups that melt into gooey perfection. Easy to assemble and bake, it’s perfect for those who crave the classic combination of chocolate and peanut butter in a moist, indulgent cake without the fuss of traditional baking.
- Prep Time: 15 minutes
- Cook Time: 35 minutes
- Total Time: 50 minutes
- Yield: 12 servings 1x
- Category: Dessert
- Method: Baking
- Cuisine: American
Ingredients
Peanut Butter Mixture
- 1 can (14 oz) sweetened condensed milk
- 1 cup milk (any kind)
- 1/2 cup creamy peanut butter
- 1 teaspoon vanilla extract
Cake
- 1 box (15.25 oz) chocolate cake mix
- 1/2 cup butter, melted
- 1 (10-12 oz) bag mini peanut butter cups, unwrapped
Optional Toppings
- Chocolate syrup for drizzling
- Whipped cream or vanilla ice cream for serving
Instructions
- Prepare the Peanut Butter Mixture: In a large bowl, combine the sweetened condensed milk and milk. Add the creamy peanut butter and vanilla extract. Whisk or blend with a hand mixer until completely smooth with no lumps, creating a creamy peanut butter base.
- Prepare Baking Dish: Preheat your oven to 350°F (175°C). Grease a 9×13 inch baking dish well using butter or cooking spray to prevent sticking.
- Assemble the Cake: Pour the peanut butter mixture evenly into the bottom of the prepared baking dish. Sprinkle the dry chocolate cake mix evenly over the peanut butter layer, ensuring uniform coverage for balanced flavor in each bite.
- Add Butter and Peanut Butter Cups: Drizzle the melted butter evenly over the cake mix layer, making sure to cover it well to create a moist, crispy topping. Sprinkle the unwrapped mini peanut butter cups over the top, pressing them lightly into the cake mix so they melt slightly during baking.
- Bake: Place the baking dish into the preheated oven and bake for 30-35 minutes, or until the top is golden brown and the cake is set with moist crumbs on a toothpick test. The cake should retain a gooey texture.
- Cool Slightly: Remove the cake from the oven and allow it to cool for 15-20 minutes to let it set and prevent burns from hot peanut butter cups.
- Serve: Optionally drizzle with chocolate syrup for extra richness. Serve warm with whipped cream or vanilla ice cream atop for added indulgence.
Notes
- You can substitute chocolate cake mix with yellow or peanut butter flavored cake mix for variation.
- Try different candies like chopped Snickers, Reese’s Pieces, or chocolate chips instead of peanut butter cups.
- Add chopped peanuts or pecans before baking for a crunchy texture.
- Use a gluten-free chocolate cake mix to make this recipe gluten-free.
- For a slow cooker version, layer ingredients in a slow cooker and cook on low for 3-4 hours until set.
- Store leftovers in an airtight container at room temperature up to 3 days or refrigerate for longer freshness.
Keywords: Peanut Butter Cup Dump Cake, chocolate peanut butter cake, easy dump cake recipe, no-fuss dessert, peanut butter dessert, chocolate cake with peanut butter, quick cake recipe